How does the Add reservation screen work in the salon?
- Answer
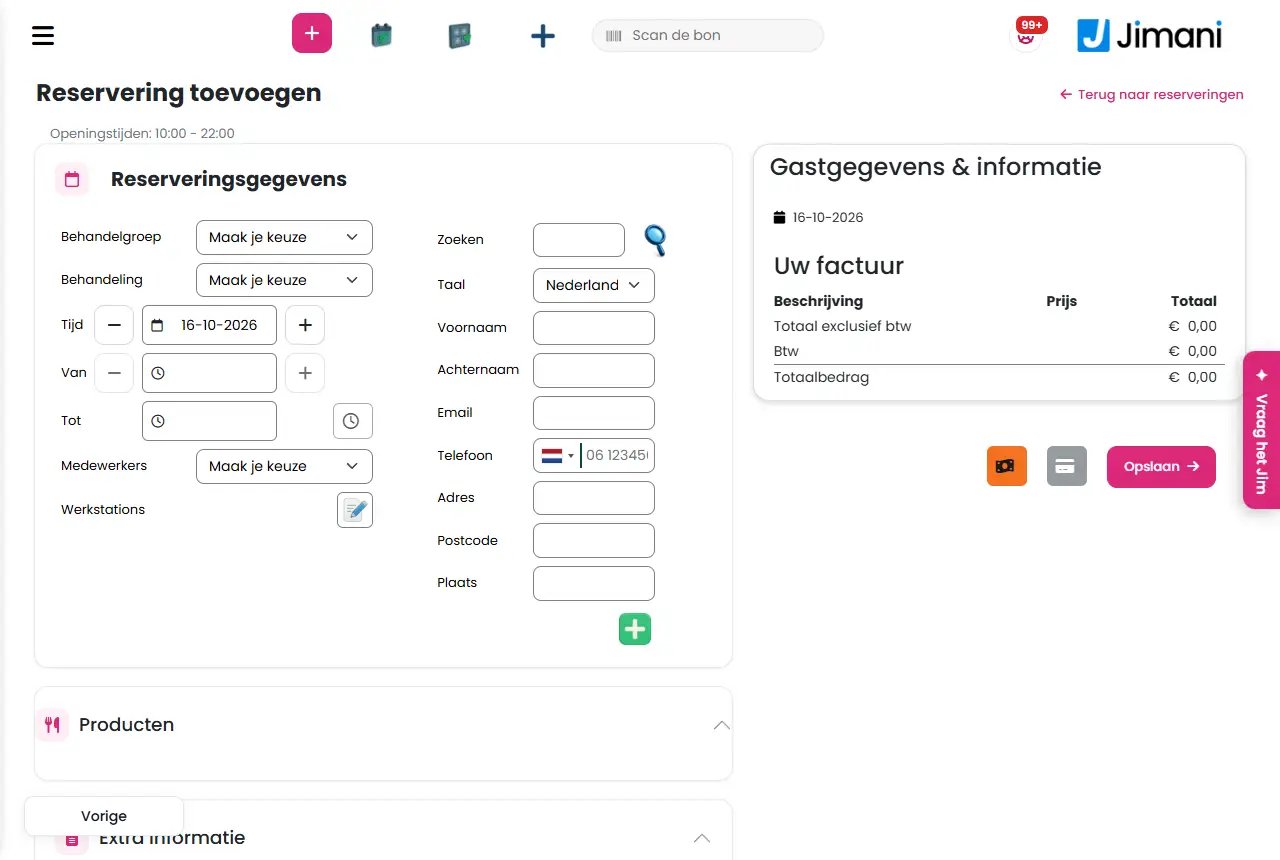
On the Add reservation screen you make an appointment for a guest yourself: you choose treatment, day, time, employee and workstation, fill in the guest and save. You open it with Create reservation in the calendar.
- Where to find it
Menu > Reservations (or Salon in the POS) > button Create reservation (
/SalonReservation/AddReservation). The same form is also at/SalonReservation/Add, which the calendar uses for follow-up appointments.- Explanation
You fill in the form from top to bottom. Only when Treatment group, Treatment, the day and the time have been chosen does Jimani load the available employees, the products and the extra information. In the date picker, the days on which the salon is open and an employee works are highlighted (the next three months); you cannot choose days in the past. Jimani fills in the end time itself from the treatment's duration (at the latest 23:59). At the bottom is Your invoice with the lines, and below it Save and the two payment buttons.
- Buttons and settings
Name What it does When you use it Note Treatment group Choose the target group first. The list starts with Make your choice. Always. Otherwise you get the message Select a gender. Treatment Choose the treatment from the chosen group. If there is only one, it is chosen automatically. Always. Otherwise you get the message Select a treatment. Time The day of the appointment. Next to the label are the Opening hours of that day; if the salon is closed then, it says The salon may not be open on the selected arrival date. Always. Choose a highlighted day. From The start time. With the plus and minus buttons you go to the next or previous free time. Always. Free times are shown per quarter of an hour. Until The end time, calculated automatically from the treatment's duration. - - Available times Button next to Until that opens a window with all free times; click one. When you want to see the free times. The button is off as long as there is no free time. Employees The employees who are free for the treatment at that moment. The list starts with Make your choice. Always. If the employee already has an appointment at that time, the message This employee already has an appointment at this time follows. Workstations With the pencil you open the Available chairs window (Select a chair to make the reservation); choose one and click Save. Always; an appointment needs a workstation. If there is no free chair, it says No chairs are available. Passer-by (no guest details) Yes/No, default No. On Yes you do not need to fill in guest details. For a guest who does not want to or cannot be recorded. Then you do not need to fill in guest details. Check in now Yes/No, default No. On Yes the day and time become the current time and the guest is immediately set to Arrived. For a guest who is already here. The choice only appears if checking in with Check in now has been turned on for the salon in the settings. Search Look up an existing guest by email address or phone number and click the search icon. You get the Guest search window with the columns Last name, First name, Address, Postal code, Place of residence, Phone and E-mail. For a returning customer. If you find nobody, it says No data found. Language The guest's language, for the confirmation. Always. - Reservation name The name the appointment is under. Especially for a passer-by. - Products Collapsible block with the extra products for this treatment. Choose what the guest wants as well. For upselling. See the article about products. Extra information Collapsible block with the extra fields you set up for this treatment. For the answers to your own questions. See the article about fields. Internal memo A note for yourself with the appointment. For a point of attention. The guest does not see the memo. Add to quote Tick next to the Internal memo. - Only this name appears on the screen. Guest data & information Block with the guest's details, according to the fields you set up for guest details. Always, except for a passer-by. Required fields must be filled in (Fill in the guest's required details). Guest Reservation Table with the guest's earlier appointments and reservations: Module, Reservation type, Reservation date, Reservation time, Quantity, Revenue and Method. To see the history. - Your invoice The appointment's lines with Description, Price and Total, and the amounts Total excluding VAT, VAT and Total amount. To check the amount. All prices are entered including VAT; the VAT is shown separately. Total amount The amount including VAT. The payment window also shows Total VAT and Total amount again. - - Total VAT The VAT amount in the payment window. - - Total paid What has already been paid. For a paid appointment. - Outstanding amount What still has to be paid. For a partly paid appointment. - Save Saves the appointment without payment (the guest pays later). The appointment gets the status Open. Usually. Afterwards an empty form for today appears. Confirm payment Window that opens when you click one of the two payment buttons (the bank card symbol for another payment, the banknote for cash). You see the amounts and choose Pay or Cancel. When the guest pays right away. After Pay you go back to the calendar and the appointment shows as paid. Pay Confirms the payment and saves the appointment. - - Cancel Closes the payment window without saving. - - Make a new appointment Window in the calendar to schedule a follow-up appointment from an appointment. For a returning customer. See the article about a follow-up appointment. Time slot Choice in that window: after how many days or weeks the next appointment comes (1 to 6 days or 1 to 12 weeks). - - Select an employee Choice in that window: who the next appointment is with. - - - Messages
Message What it means What you do Reservation added successfully Jimani has saved the appointment. Nothing; you immediately see a new form or the calendar. Invalid reservation data The data did not come in properly. Fill in the form again. No chair selected! You have not chosen a workstation. Choose a workstation under Workstations. Chair not available! The chosen workstation is taken at that time. Choose another workstation or another time. This employee already has an appointment at this time. The employee does only one treatment at a time. Choose another time or employee. Select a gender. Treatment group is missing. Choose a Treatment group. Select a treatment. Treatment is missing. Choose a Treatment. Select the arrival and departure dates. Day or time is missing. Fill in Time, From and Until. Select a professional. No employee has been chosen. Choose an employee. Select a chair. No workstation has been chosen. Choose a workstation. No chair selected. You click Save in the chairs window without choosing. Choose a chair first. No chairs are available. There is no free workstation. Choose another time or employee. Fill in the guest's required details. A required guest field is empty. Fill in the field. - Related
How do I make an appointment for a customer myself?, How do I schedule a follow-up appointment?, How do I change or reschedule an appointment?
- Which details do I fill in for a new appointment?
- How do I open the screen to make an appointment?
- Do I have to choose a workstation for an appointment?
- Where do I enter the guest details?
Keywords: make appointment salon, add reservation hairdresser, book in appointment, schedule customer, walk-in appointment, check in now salon
Last checked: 2026-10-16
Translated from the Dutch knowledge base; the Dutch version is leading.